Sadly, my wallpaper got rejected. I thought my work of art was great but the critics would opposed to that. So, I submitted another one and it soon got rejected. Now, I was wondering what could be wrong with my anime wallpapers. I then looked back at what the rejector wrote, he/she said either the wallpaper was too blurry or the image quality was too low; I went to ask some of friends for their opinion on my wallpaper and sure enough they saw the same mistake. Seeing that I needed more improvement, I decided to learn how to solve my mistakes through watching gimp tutorial videos and reading articles about photo retouching.
Well, I didn't submit any more wallpaper to that site, but I gather all of my information on how to make an good anime wallpaper in here. I hope this tutorial will help you in becoming a better wallpaper maker~
TUTORIAL:
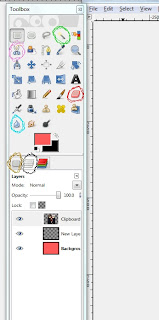
Tools I will be using/referring.. Note: You should have a reddish or contrast background color from your background as a layer below the image you are working with.

Green: Fuzzy selection tool
Pink: Scissors select tool
Red: Eraser tool
Blue: Blur/sharpen tool
Brown: Tool options
Black: Layers
Image Retouching
Your aim to make the entire wallpaper to look well balance with no jagged lines, pixel, over saturated colored, over exposed, etc.
Step 1: File > new > template > 1024x768..Oh, I forgot to change 72.00 to 300 x and y resolution pixel/in. ... Copy an image you want to serve as a main focus to your wallpaper. The image below is the original image I'm working with.
Step 2: Paste the image as "new layer".
Step 3: Use the scissors select tools to cut the image out. I used the fuzzy select tool to cut my image out since the background was a pure color.
Step 4: Erase any specs floating around the image, don't worry yet about the fuzzy/harsh boarder around your image. I used the erase tool to erase some of the white background that got is in between the hairs of the characters. (Tip: Use the Zoom tool to zoom in the image when erasing anything that lies close to your image and or in between stuff.)
Step 5: Check your image for any more specs or background you need to erase.
Step 6: Left click your image layer to select it and then right click it so a menu will show up then left click alpha to selection in the menu > go to select located on the top bar> left click shrink for choose 1 pixel or more depends on the thickness of your image outline > go to select on the top bar then left click on feather choose 2 through 3 pixel > go to select on the top bar then left click invert > go to edit on the top bar choose cut > select none
Step 7: Erase any other specs in between the hairs (tip: on the tool options you can adjust the eraser size by playing with its scale.)
Step 8: Using the scale tool you can enlarge your image, enlarge an image so it look balance with the wallpaper. (Tip: use the perspective tool to stretch the image a little if you feel like it looks platter onto the background.)
Step 9: BEFORE ANY PROCEEDING..Do whatever design you want for your image then continue. This part tell you how to make your image look high quality.. You will have to play with for the best image result for your image.. I will tell you what numbers I plugged in.
Filters > Selective Gaussian Blur max. delta must not be above 10.. your aim is to smooth the image color without losing details. Leave blur radius at 5.00 too~ Press okay once you got a minimal effect.
Step 10: Go to filters > enhance > unsharpen mask.. Radius: 5 amount: no more than .2 threshold: between 20 through 30...
(OPTIONAL: Follow steps 3 and 4 in this link ... it may help your image color to be more balance or may make it worser.. if so then just stick to manual technique.)
Image should be neat and nice.. So this process is done, time to start working with the background.
Step 11: Choose any background or make one out of your own craft.. Do the same as the background as you did for your image.
Step 12: Once you are satisfied with what you have then right click one layer and left click on merge visible layer.
Step 13: Save your wallpaper as .jpg with 100% quality
Bada beam bada boom! This tutorial is done and you should have a pretty nice wallpaper but I would like to address some of the problems that you may run into.
When you enlarge any image, you will damage some parts of the image like getting jagged lines and blurness. Sometimes you fix the image with the things I told you in here but sometimes it just far from repair. Your next option is to draw the entire image out by using the path tool and then painting the image like how to original is.
tutorial on path tool drawing:
click here


No comments:
Post a Comment